Stitch layers 3b: new version of the Gimp Python script

This new version allows you to select the type of interpolation that will be applied to the mobile layer and optionally have it work on a copy of the layer instead of on the original layer

Interpolation types

Image with the paths showing the coincident points of each layer. Images resulting from applying the plugin with the different types of interpolation:
  • None
  • Linear
  • Cubic
  • Nohalo
  • Lohalo

Download

arakne-stitch3b

Notepad++ CSSList 0M version: New options

This version improves the selectors search to generate the list and fixes some errors.

New options

Button to search for the selected text in the selectors list  Buttons to open in the editor the files that generate the lists of property names, possible values and linked properties Text field to go to the especified line number

Download

cssList0M – 32bit cssList0M – 64bit

Related posts

Contribute

Make cssList speak your language, more info https://github.com/jfgartol/notepad-csslist-translations

Rhinoceros 3D: prevent failures when exporting to stl

Many times we have to correct fails in models exported as stl, faces with misguided normal, holes without closing etc … With this simple trick we can avoid many of these failures during the modeling process.   We assign a color to the inside of the faces of the objects: go to the Display tab and in the Display Mode drop-down select Shading or Rendering (solid views). When you select either of these two options, click on the check box and select a color in the mixer that appears when you press the Color Backface button. When selecting the color we can see that the model that was apparently good has all the normal pointing out, we would have to use the reverse command or repeat the form creation command by adjusting some parameters. Once corrected we are still seeing parts of the selected color for the inside of the faces, we would have to close the model or give thickness to the surface so that the exported stl does not fail us to open it from the program we use to prepare it for 3d printing (slicer).

Inkscape extension Shapes: New options

This revision of Shapes adds some improvements:
  • Increase/decrease the size of the selected objects

    Lets modify the size of the bounding box of the selected objects and thus modify the size of the resulting shapes.
  • Changes in Join circles

    It is no longer necessary to apply Boolean operations to the resulting shapes, all options return a single object that is the union of the two selected circles.

    New kind of union: Oval

  • Bug fixing:

    Fixed a bug when copying style from objects with no style assigned

Download

shapes_2017_08_30 Latest version
Inkscape Shapes 1 extension: new shape Paper Craft Tab

Inkscape extension: Shapes new version

This new version adds new shapes to the previous and rearrange some tabs

Changes in Rombus

The Rombus shape goes to the From corners from corners tab. Now is posible use Size for the corners

New shapes Crossed  corners

This new shape uses the bounding box of the selected objects for create shapes where the borders crosses himselfs in 3 different ways creating squares, triangles or circles

New tab Spikes

The tab Spikes lets repeat a profile over the perimeter of the selected objects with a size and separation defined by the user. We can choose between five profiles and 3 directions: outside the selection, inside or alternate. Samples of each type of profile and the different directions:

Join circles

This option creates a path that joins smoothly two circles of different radius. For get the final shape is necesary perform some extra boolean operations.

Descarga/Download

inkscape_arakne_shapes_2017_08_10

svg2pov tutorial: Table part 1

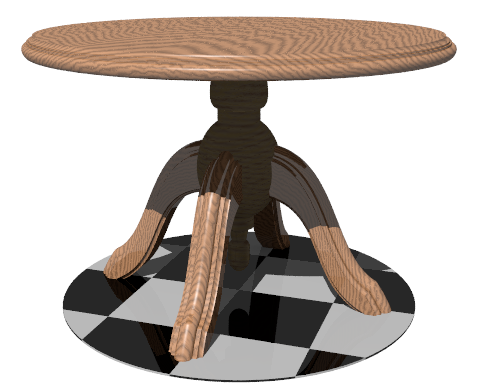
testTableDef In this first part of the tutorial we will create a table that combines lathe and prism objects and learn how to add additional povray code from inkscape using the extension “svg2pov Extra properties”

Step 1: Top of the table

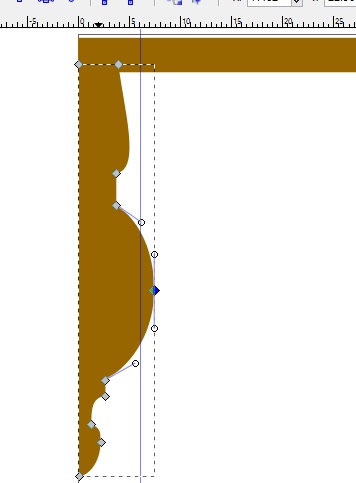
tuttable01Create the profile of the top of the table ensuring that the interior vertices are in the coordinate x=0 to avoid hole in the center.

Step 2: Add export properties to inkscape path

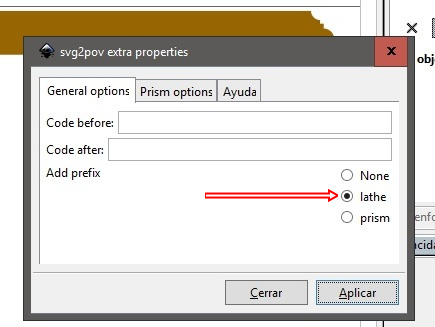
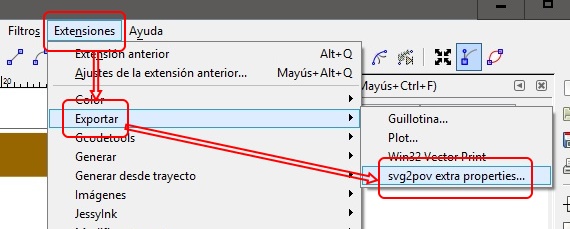
With the path we’ve created selected go to Extensions\Export\svg2pov extra properties… to assign as lathe type, povray generates a object by rotating this profile about his Y axis. tuttable02 tuttable03In the dialog box that appears when you select that option press the radio button lathe, this option adds to the id of the selected path the prefix lathe_ to tell the script that is the type of object to be created in the exported .pov file.
Step 3: Export and render first test
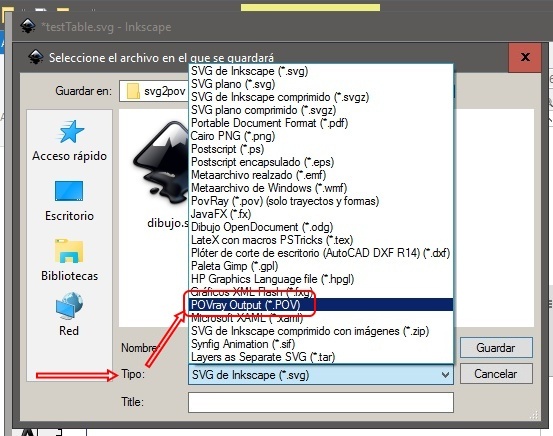
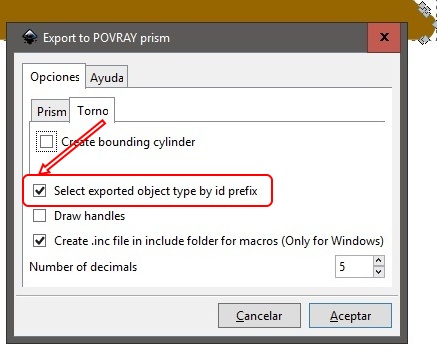
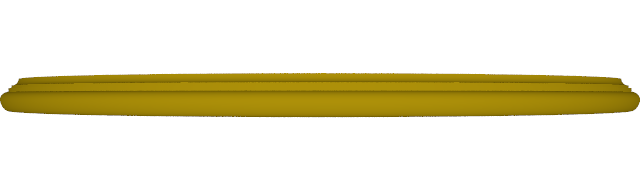
tuttable04 Export to povray file to check the result. From the menu File\Save As… select Type POVray Output (*.POV) . tuttable05In the dialog box that appears select the option Select object type exported by id prefix and press OK to start the export process. Upon completion of the process in the same directory on your file .svg will have a .pov file with the chosen name, open it from  povray and we launched a first render test, the result is as follows: tuttable06renderThe export script creates a camera located at coordinates that allow all objects appear in the render and a light.
Step 4: Central Leg Table

From inkscape we create another path for the central leg of the table from which the other four legs, follow the same guidelines as for the top:tuttable07We follow the instructions in steps two for assign the export options to this path and step three to export and do a test render. The result: tuttable08render
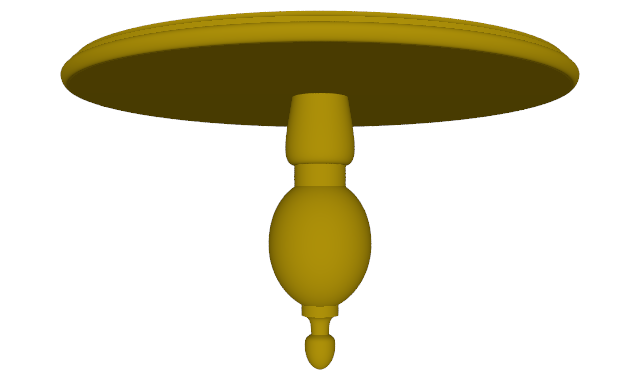
Step 5: Legs

tuttable09From inkscape create the path to be used for all four legs emerging from the center leg, in this case it is not necessary that the interior points are at coordinate x=0 because the object to be exported is a prism. With this path selected go to Extensions\Export\svg2pov additional properties… to assign as prism type and add additional pov code before and after the exported code, we will use the text fields Code before and Code after. tuttable10 In the field before write this pov code:
 #local leg=object {
With this code we assign the exported object to the variable leg for later use in a loop for and create the four legs. And in the field after:
 rotate -x*90}\n#for (i,0,4) object{leg rotate y*(i*90)} #end
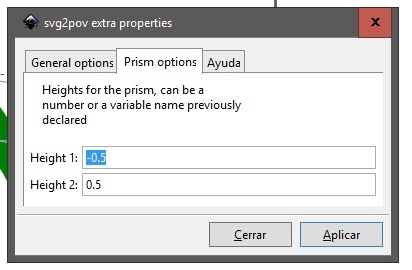
With this code we rotate the the exported object in te x plane since the prism objects are created in the Y plane and close the block object created in the field before. Then we use a loop that rotates the leg object 4 times on the plane Y. Note: text fields in the inkscape extensions only allow one line, if we need more text lines in the code will include the characters \n . In the Prism options tab set the values -0.5 and 0.5 in the fields Height 1 and 2 to give a total thickness of 1 to the prism.tuttable11 Follow the instructions from step three and export and launch a test render. The result: tuttable13render In the next part of this tutorial we assign textures and give more detail to the legs.

Inkscape svg2pov new version: export as lathe

This new version of the script in python for inkscape adds the option to export as lathe for povray, draw the bezier curves handles and only for windows the option to save all macros in a .inc file within the includes directory of povray. svg2povoptions

How to use

From the menu “File” choose the option “Save As…” and select the type “POVray Output (*.pov)”, select the name for the pov exported file. In the dialog box select the options you need

Export as lathe

testSVG2POV_test

Draw handles

To draw the handles the macro drawHandles is used with two arguments: the array with the position of the handles and the thickness of the cones and spheres used to create them testSVG2POV

Create file include

Using the include reduces the size of the exported file making easier the edition useinc

Descarga/Download

Download the file and unzip it into the extensions directory of your installation inkscape svg2pov_2016_08_30

Gimp plugin: shape creator V8

New version of the plugin for create paths in Gimp, changes make incompatible to the previous version. News:
  • Shapes grouped by category
  • Radioboxes and checkboxes in the interfaz
  • Help images for new shapes or more complex
  • New shapes
New shapes:
  • Moon
  • Foldables: box
  • Foldables: letter
  • Cloud
  • Arches: ojival y tudor
  • Radial ruler

Install

This version is not compatible with the previous, is mandatory delete the folder shapes and arakne-path-shape-creatorX.py. More information in this post http://www.arakne.es/en/dessign/gimp-scripts-python-where-to-install/

Download

arakne-path-shape-creator8

Inkscape: INX parser

This script helps develop inkscape extensions, looks up variables declared in an INX file, and generates the python code for the init function and optionally the declaration of variables. Updated for Inkscape 1 and higher.

Options

Indent code with
Split values in lines
Create variables
Drag your INX file in the field for generate the python code